Showing posts with label tutorials. Show all posts

Monday, March 21, 2016

'Cause I Kill All the Plants {DIY}

Yes, I admit it.  I'm a cold-hearted, ruthless plant killer.  Well, actually, that's not really true.  I'm more of a "How could I have forgotten to water you?!" sap kneeling by the dying plant's grave in sorrow.  Either way, growing green things & I don't have the best track record.  That's where this DIY stems from {I couldn't resist}...

& everything you need can be found at the dollar store!
I found all the goods above at my local Dollar Tree!  All you need to do is fill your glass container with decorative pebbles {I actually only used 1 of the 2 bags, but depending on your container size you may need more}.  
My faux succulents came inserted in black styrofoam in plastic pots, so I took them out, & snipped 'em down a bit so they'd fit in my glass bowl easier.  Then, I nestled them down in the pebbles.
While some don't do "faux" {which I totally get & would rather have a green thumb, by the way}, it's easier to sleep nights knowing these guys won't be my next victims.  You know the whole talking to plants thing {to encourage them to grow}?  It's still okay to talk to faux plants, right? =)

Crafty Love,
-Bess-

Friday, January 22, 2016

{Super Easy} Photo Display DIY


Ever had one of those projects that sits around for months 'cause you're not exactly sure what it's gonna be yet?  This was that for me.  I water color painted over this inexpensive thin canvas months ago & have been puzzled as to what I wanted to do with it since.  That is, until today...


Above are the supplies needed for this project.  If you'd like to make a stand for your photo display {instead of leaning it against something}, you'll also need some sturdy cardboard.  P.S.: A ruler is quite helpful, too!

Paint/decorate your canvas {or leave it clean & simple minimalist white}, find the center of the canvas with a ruler, & attach a metal clip near the top center using hot glue.  {NOTE: If you have a certain size photo you want to display, it's helpful to place the metal clip on the image prior to hot gluing to see how you want it spaced on the canvas before you affix the clip down.}


If you decorate your canvas, printing a photo or quote on a piece of vellum lets your design peek through.

It feels good to get things done!  I like the fresh simplicity of this project & it's versatility... it would make a great recipe or note holder, too.


DIY Love,
-Bess-

Saturday, December 13, 2014

Chipboard + Ribbon NOEL Bunting


Have I mentioned I heart buntings & garlands?  I'm sure I have, but it's worth saying again.  Here'a a little DIY I whipped up to hang outside {though it would look good anywhere}!


Here's What You Need:
chipboard {mine is a chipboard ring-bound book I took apart from Michael's}, paint/foam brush {if you like}, glitter ribbon, heavy baker's twine, gluestick 


Here's What You Do:
Paint your chipboard whatever color you wish {or leave it in its natural state}.  Cut pieces of glittery ribbon to create the word "NOEL" & carefully use your gluestick to adhere them to the chipboard.  String bunting pieces onto heavy baker's twine & hang up {I used a hammer & small nails to knot the twine around}.  


I'm later than usual with my Christmas projects & decor, but it's just been busy here lately.  How is your decorating coming along?

Merry {Christ}mas,
-Bess-

P.S.: Jesus is the reason for the season!

Monday, November 24, 2014

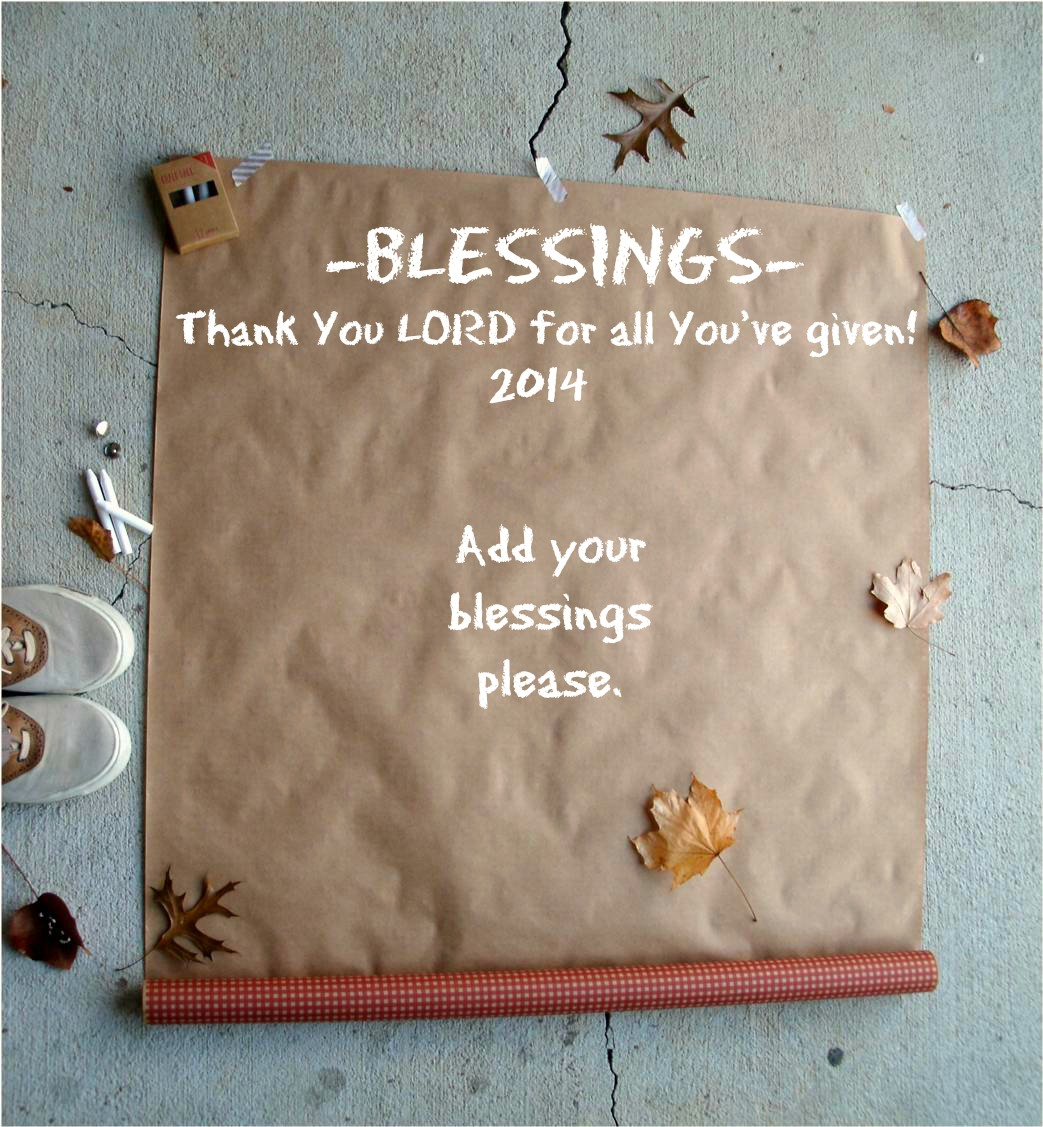
Thanksgiving Blessings Wall DIY

I wanted a way to document my blessings, as well as my friends' & family's who stop by.  Here's what I came up with!

What You Need:
brown wrapping paper {I got mine at the Dollar Tree (it has a design on one side, but is plain on the other)}; thumb tacks {2-4}; chalk

What You Do:
Secure your wrapping paper to the wall with thumb tacks.  {I used only one roll this year {hoping this will be the start of a tradition}, but I think it would be cool if you used several & covered an entire wall with blessings - especially if you're having a big shindig!}  If you, however, have a bumpy/stucco wall, I suggest you tack one or more thin foam poster boards underneath your brown paper, so you'll have a smoother surface to write on.  Add your blessings & invite your guests to do the same.  Make sure to keep the chalk nearby!


Quick Tip: You can easily create a point on a new piece of chalk by using a regular hand held pencil sharpener.  Try it!

Love & Blessings,
-Bess-

Wednesday, November 12, 2014

6 Easy DIY Napkin Rings

I love the idea of using cloth napkins, but in all honesty, I get around to actually using em once in a blue moon.  I want to change that, & so I thought if I fashioned some napkin rings I'd get into using them on a more regular basis.  Here's hoping!  I think these would be a fabulous addition to the upcoming holiday dinner table!  

Super Easy:
1. Fill little drawstring sacks with candies & tie around napkins.  In this case, the napkin ring can double as a favor for guests to take with them!

2. Fold the napkin in a square or rectangle & tie present-style with tinsel or ribbon.

3. Look for over-sized buttons like these at the craft store {though any button will do}.  Thread twine or thin ribbon crisscross through the buttonholes & tie around your napkin, securing in the back with a loose knot or bow.

Bit More Work, But Still So Easy:
4. String beads onto craft wire & form into a small circle by twisting wire ends together.  Take plain gift tags or labels & personalize with each guests' name & tie around the napkin rings.  Not only will each guest feel special, but they'll know right where to sit!


5. Cut thin strips of felt {mine are approximately 1 1/2 in. X 6 in.}.  Take a button & sew it onto one end of the felt strip & carefully snip a hole with scissors in the other end {make sure the hole will fit your button well}.


6. Again, string beads onto craft wire {or you could use jewelry elastic} & form into a small circle by twisting the wire ends together {or by tying a knot if you're using elastic}.  Create a simple tassel & secure around your napkin ring at the place where you twisted the wires together {your tassel will work great to conceal any visible wires}.

DIY Love,
-Bess-

P.S.: I hope this has inspired you to get busy & create your own napkin rings for all the little special days that fill up the calendar {all 365 of em}!  I love a bit of fancy in the midst of regular life, & in my book, napkin rings are pretty fancy stuff. =)

Tuesday, October 21, 2014

Hipster-ish Pumpkins


All you need are pumpkins, paint, & some decorative wood veneer pieces {I got mine from Michael's craft store}.  I found it took at least a couple layers of paint to cover each pumpkin, so be sure to allow time for drying in between coats.  Next, glue on your wood veneer pieces & let dry {you can use something like Elmer's or hot glue if you prefer}.


I have to say, I think the little specs guy is a cutie!


These might be heavy on the ish of hipster-ish, but it seemed appropriate at the time. =) 


Booyah {er, Love},
-Bess-

Monday, October 20, 2014

Decorative Stud Pumpkins


All you need are some decorative studs & pumpkins!  The studs should push in fairly easily, like a thumbtack into a cork board.  I found it can cause a bit of pumpkin juice to drip from the puncture, so dab that up with a paper towel & you're good to go!


You can even make an easy-peasy Jack o' Lantern face!

Pumpkin Love,
-Bess-

P.S.: Do you prefer faux or real pumpkins?  Or both?

Sunday, October 19, 2014

Black Cat Fetish

The Cat's Meow
I've got a thing for black felines lately.  I have no pets, but appreciate cat cuteness all the same.  Remember this cat beanie hat I made last year?  If you have a black cat fetish you should definitely go check it out...  Oh yes, & snag that free tag printable!


Meow Love,
-Bess-

P.S.: My hair was so long last year {it's about half of that currently}!

Friday, October 3, 2014

DIY Sharpie Mugs


It really is that simple!  Draw your design with any Sharpie permanent marker, bake in the oven for 30 minutes at 350 degrees, let cool, enjoy - oh, & hand-wash {the dishwasher isn't too friendly with these creations}. 


I've seen this DIY all over Pinterest / the Web, but had never given it a try.  It worked great - it's just a little tricky writing on the curved-ness of a mug.  I can't wait to try out making more!

DIY Love,
-Bess-

P.S.: What would you write &/or draw on your mug?

Thursday, September 25, 2014

Guest Posting Today! {DIY Word Art Pillow}


Hello all!  I'm guest posting today over at sweet Charlotte's blog {Inside Charlotte's Mind}.  Stop by & learn how to make the pillow shown above, won't you?  Be sure to explore the brand new Inside Charlotte's Mind, too!

DIY Love,
-Bess-

P.S.: Can you believe October is almost here?!

Monday, August 25, 2014

DIY Starry Shadow Box

A couple days ago I shared Laura Story's song "Keeper of the Stars" along with 2 free lyric printables to choose from.  Today I'm going to share how I used one of the printables to create a starry shadow box.  Let's get started, shall we?

What You Need:
-1 of the free printables {& a printer, of course} =)
-a shadow box
-black contact paper or black paper {or you could use black paint & cardboard fitted to your shadow box size}
-scissors
-a small strand of twinkle lights {preferably battery powered (makes it easier than having to be close to an electrical outlet)} {I found these battery powered star ones at the Dollar Tree}
-gluestick


What You Do:
Resize your printable in a word document to a suitable size for your shadow box {don't forget to allow space for your twinkle lights}.  Print & cut out your printable.  Cut your black paper to fit your shadow box & begin carefully cutting small slits for your twinkle lights around where your printable will be glued.  Once you've done that, you can gently poke through your lights {if you have decorative lights similar to mine pop the decorative bulb cover off, slip the light through your cut slit, & put the cover back on}.  Glue your printable to the center of your black paper {you can also carefully cut any additional light slits you'd like over the printable, as well, too}.  Place your creation into your shadow box, turn on the twinkle lights, & remember to give everything {big & small & in between} over to our mighty God.  He is in control!

Starry Love,
-Bess-    

Tuesday, August 19, 2014

Adventures in Weaving

I've been eyeing the often charmingly eccentric woolly wall art popping up everywhere recently with a "I rather like it!" continually on my lips.  Thus, I decided to try my hand at it using an old paint-chipped metal loom unearthed from a this-&-that drawer in my mother's house - designed to create pot holders, originally {the loom, not the drawer =)}.  I did not know what I was doing at the start, really, {or throughout the whole back breaking/neck aching process, truthfully} but I kept it up anyway... over & under & over & under... & ended up with something I rather like!

*It's easy to create your own weaving loom out of cardboard.  Try the tutorial here!

A Bit of Inspiration...

Weaving Inspiration

My "stitches" started out well, but got rather wonky in the middle working around the triangle design, but that just adds to the charm, don't ya think?

I didn't have a dowel, so I used what I had: a chopstick!

I want to try one with more fringe next time!  I'll keep you posted!  Have you ever tried your hand at weaving?  What do you think of the woven wall art craze?

Weaving Love,
-Bess-