Showing posts with label Dollar Tree. Show all posts

Monday, March 21, 2016

'Cause I Kill All the Plants {DIY}

Yes, I admit it.  I'm a cold-hearted, ruthless plant killer.  Well, actually, that's not really true.  I'm more of a "How could I have forgotten to water you?!" sap kneeling by the dying plant's grave in sorrow.  Either way, growing green things & I don't have the best track record.  That's where this DIY stems from {I couldn't resist}...

& everything you need can be found at the dollar store!
I found all the goods above at my local Dollar Tree!  All you need to do is fill your glass container with decorative pebbles {I actually only used 1 of the 2 bags, but depending on your container size you may need more}.  
My faux succulents came inserted in black styrofoam in plastic pots, so I took them out, & snipped 'em down a bit so they'd fit in my glass bowl easier.  Then, I nestled them down in the pebbles.
While some don't do "faux" {which I totally get & would rather have a green thumb, by the way}, it's easier to sleep nights knowing these guys won't be my next victims.  You know the whole talking to plants thing {to encourage them to grow}?  It's still okay to talk to faux plants, right? =)

Crafty Love,
-Bess-

Tuesday, June 23, 2015

Decorative Duct Tape Bible Recover

My Bible cover's gotten really worn over the years.  In fact, little specks of colored leather flake off at will.  The Bible was actually a Christmas gift from my mom over a decade ago in high school.  It's been well used & though the cover is rough, the inside Truths are still rock solid.  So, I decided to take some decorative duct tape I snagged at the Dollar Tree & fix it up.  I tried as best I could to let the design on the tape match up with each strip I applied + I was extra careful with the spine, edges, & corners.  I'm pleased with how it turned out! 

"A Bible that's falling apart usually belongs to someone who isn't."
-Charles Spurgeon

It's not always the case for me, but I pray the above is true more & more & more.  We are works in continual progress, & He is so gracious to me.

Love,
-Bess-

P.S.: I'm working through this Bible-in-a-year plan {above} that I started this month.  They say June's the new January, right?

P.P.S.: Have you ever used duct tape on a Bible or book or some other craft project?

Monday, November 24, 2014

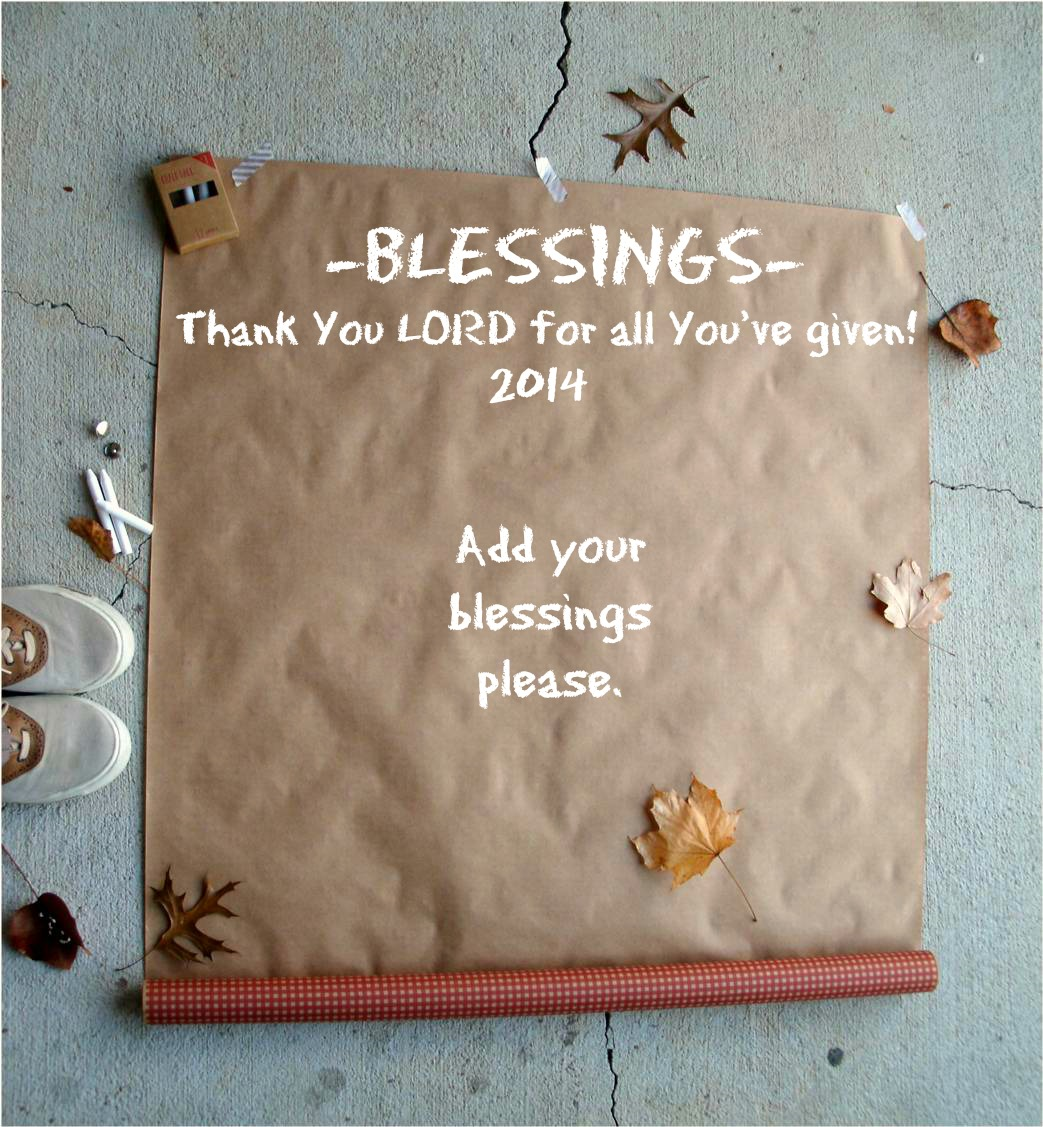
Thanksgiving Blessings Wall DIY

I wanted a way to document my blessings, as well as my friends' & family's who stop by.  Here's what I came up with!

What You Need:
brown wrapping paper {I got mine at the Dollar Tree (it has a design on one side, but is plain on the other)}; thumb tacks {2-4}; chalk

What You Do:
Secure your wrapping paper to the wall with thumb tacks.  {I used only one roll this year {hoping this will be the start of a tradition}, but I think it would be cool if you used several & covered an entire wall with blessings - especially if you're having a big shindig!}  If you, however, have a bumpy/stucco wall, I suggest you tack one or more thin foam poster boards underneath your brown paper, so you'll have a smoother surface to write on.  Add your blessings & invite your guests to do the same.  Make sure to keep the chalk nearby!


Quick Tip: You can easily create a point on a new piece of chalk by using a regular hand held pencil sharpener.  Try it!

Love & Blessings,
-Bess-

Monday, August 25, 2014

DIY Starry Shadow Box

A couple days ago I shared Laura Story's song "Keeper of the Stars" along with 2 free lyric printables to choose from.  Today I'm going to share how I used one of the printables to create a starry shadow box.  Let's get started, shall we?

What You Need:
-1 of the free printables {& a printer, of course} =)
-a shadow box
-black contact paper or black paper {or you could use black paint & cardboard fitted to your shadow box size}
-scissors
-a small strand of twinkle lights {preferably battery powered (makes it easier than having to be close to an electrical outlet)} {I found these battery powered star ones at the Dollar Tree}
-gluestick


What You Do:
Resize your printable in a word document to a suitable size for your shadow box {don't forget to allow space for your twinkle lights}.  Print & cut out your printable.  Cut your black paper to fit your shadow box & begin carefully cutting small slits for your twinkle lights around where your printable will be glued.  Once you've done that, you can gently poke through your lights {if you have decorative lights similar to mine pop the decorative bulb cover off, slip the light through your cut slit, & put the cover back on}.  Glue your printable to the center of your black paper {you can also carefully cut any additional light slits you'd like over the printable, as well, too}.  Place your creation into your shadow box, turn on the twinkle lights, & remember to give everything {big & small & in between} over to our mighty God.  He is in control!

Starry Love,
-Bess-    

Tuesday, May 27, 2014

Make a Summer Fun Bucket!


I love the idea of celebrating days {ordinary & special, alike} & starting traditions.  Even though it's just me - & sometimes it seems silly to start a tradition for one - I'm rather into this kind of silliness {+ I don't want to look back at my single years to discover I put life on hold - I'm living now (at least that's the plan)}! =)  So, in celebration of summer, I gathered & purchased some goodies to ring in the new season.


To make your own {& start a new tradition} just find a bucket, tub, or basket {mine is from the Dollar Tree}.  Fill your bucket with goodies that'll help you celebrate summer {& that just make you happy}!  Now, you've got all you need in one place to make ordinary, summery days extra special!  Hmmm, maybe there needs to be an autumn, winter, & spring version, as well...

Summer Fun for All,
-Bess-

P.S.: Summer fun buckets go great paired with summer bucket lists!  What's on yours?

Monday, April 14, 2014

Candle "Shine" DIY


"You are the light of the world.  A city on a hill cannot be hidden.  Neither do people light a lamp & put it under a bowl.  Instead they they put it on its stand, & it gives light to everyone in the house.  In the same way, let your light shine before men, that they may see your good deeds & praise your Father in heaven."
-Matthew 5:14-16 NIV

What You Need:
tall glass candle; plastic letters to spell "shine;" hot glue gun

What You Do:
I found these plastic scrapbooking letters at Michael's craft store & the candle at the Dollar Tree.  Attach each letter to the glass with a little hot glue.  Enjoy & may the candle glow remind you to shine His light!


Love & Shininess,
-Bess-

P.S.: I love simple powerful crafts!

Friday, October 25, 2013

Black Cat Beanie DIY


I don't know about your neck of the woods, but recently where I live it's begun to feel very autumn-y, & even downright cold!  This hat idea had been in my mind for some time now, & I'm happy to say I've finished it just in time for all the end-of-October festivals & activities, not to mention the turn in the weather.  It's a fun alternative to a complete head-to-toe costume.  I think I'll wear it to my church's fall festival this weekend! 


Click the image above to enlarge & see the supplies you need for this craft.  SIDE NOTE: My beanie came from the Dollar Tree.  Knit hats {like the one above} are best if you choose the no-sew option.

what you do:
Cut out 4 large triangles of the same size from black fabric for your cat ears, leaving enough room to hem & attach to your hat...  

sew:
If you can sew, take your needle & thread {or machine} & sew 2 sides of each of the triangles, right-sides together.  Then, reverse each ear, so the right sides are showing & sew to hat.  

no sew:
If you can't sew, or rather wouldn't, you can take your hot glue gun & carefully glue your 2 triangles together, folding the raw edge to the inside - & repeating for the 2nd ear.  If you have a knitted/crocheted hat, you can poke your ears through the natural holes in the hat & secure with a small amount of hot glue.  If not, you can carefully attach your ears to the top of your beanie {less hot glue is more, in this case}.


Love & {Lots of} Meows,
-Bess-

P.S.: I think I'm about to chop off my long locks!  I'm nervous, but if you could have seen the amount of blond hair I pulled from my vacuum {after running it unaware & nearly burning it up} the other day, you might understand why I'm ready for short {or, at least, shorter}.  I honestly think I could have made the Guinness Book of Records with the amount of tresses I pulled/cut away from the underside of my sweeper - it was about 2-3 years of accumulation!  Ugh!

Tuesday, October 15, 2013

3 Easy {No Carve} Pumpkin DIYs


Here's 3+ easy, no-carve ways to embellish a pumpkin {be it real, or faux}...

1. Chalkboard paint!  Confession time: I didn't use true blue chalkboard paint for the pumpkin above.  No, I just used plain old black paint, but I found it works just fine for this project - since I won't be erasing/reapplying chalk often.

2. Washi tape!  It's removable & comes in a variety of designs!  Super easy!

3. Permanent marker{s}!  These work great & are pretty resistant to the weather if you place your pumpkin outside.  The metallic ones {like the gold one I used above} add a bit of fancy!

More Ideas:
-add thumbtacks or decorative brads
-paint
-melted crayons
-glitter or faux gems
-stickers {letter stickers spelling a word would be nifty}
-fabric

Here's another idea I came up with last year...
Click here for the full instructions. 


Pumpkin Love,
-Bess-

Tuesday, September 3, 2013

Flameless Candle Easy Update

Flameless candles - what a fabulous invention!  I love that I can leave em unattended & not worry about my nephew being around their cozy glow {he's in kindergarten now, by the way (& reading) - mind boggling}.  However, they can look sorta plain.  Here's a super easy way to update em!


What You Need:
a medium {or larger} sized flameless candle {mine's from the Dollar Tree}; glue stick; vellum scrapbook die-cut; rubber bands; clear brush on glue {optional} 


What You Do:
Glue on your vellum die-cut & secure with rubber bands while it dries {I left mine overnight}.  If you want, you can add a clear brush on glue over top afterwards.  Easy, right?  


Easy-Peasy Crafty Love,
-Bess-

Friday, June 21, 2013

Interchangeable Fedora Embellishments DIY


It started with these fedoras from the Dollar Tree...  Pretty cute on their own, but sometimes a girl just wants a little frill.  Ya know? =)


Then, again, sometimes a girl wants to keep it simple.  So, I decided to make my embellishments temporary, & thus interchangeable, by using Velcro!

What You'll Need:
hat{s}, frills {i.e.: ribbon, silk flowers, feathers, bows, fabric, buttons, etc.}, hot glue, Velcro 


What to Do:
Create an adornment that goes around the band of your hat.  I found using my hat like a dress form works well.  Once you've got it like you want it {& made doubly sure it will fit around your hat}, add Velcro to it using hot glue {or you could sew it if you like}.


This simple style was created using one long & one short piece of ribbon.  I love that you can wear each of these embellishments on either hats!  Cause really a girl loves to change her mind {& look}. =)


I used a beaded ring & wide ribbon for this one.  I just slid the ring onto the ribbon {this way I can still wear it as a ring when I want, too}!  Easy!


Lastly, I had a magenta ribbon from some packaging that wasn't long enough to fit around my hat.  So, I improvised & added some turquoise-y feathers & brown ribbon.  This one doesn't even need Velcro - it just ties in place!

Love & Frills {for this 1st day of summer},
-Bess-

Friday, May 24, 2013

Easy Peasy Poppy Garland for Memorial Day


Poppies have long been flowers of remembrance for soldiers lost.  Back in 2010 I made poppy pins for Memorial Day {Anybody remember that?}.  This year, I created this easy-peasy garland using Dollar Tree felt coasters & twine.  Because the coasters already have holes, you can simply string them on the twine & hang them wherever this Memorial Day.  Super easy {& the total cost was $2}!  


Happy Memorial Weekend!
-Bess-